

Determined
The YanFlow cluster's Determined job system is divided into single-machine jobs and multi-machine jobs. For single-machine jobs, users only need to provide the shell commands to be executed and the relevant job code. For more information, click
Determined Official Documentation
Description
Single-Machine Jobs
This section details the single-machine job mode of the YanFlow cluster. Users can submit jobs by selecting GPU count (not exceeding the single physical machine limit), /images/zh/help, storage, and other resources via the web page.
Mode Operation Mechanism
The core of single-machine jobs lies in entrypoint and GPU resource allocation.
- GPU Mounting: The system mounts the user-specified physical GPU cards into the container to achieve GPU allocation.
- Command Execution: Inside the container, the system executes the user-provided Shell command (
entrypoint, e.g.,python train.py --epoch 100). - Resource Reclamation: After command execution completes, the container is deleted and physical resources are automatically released.
The single-machine job interface is shown below: 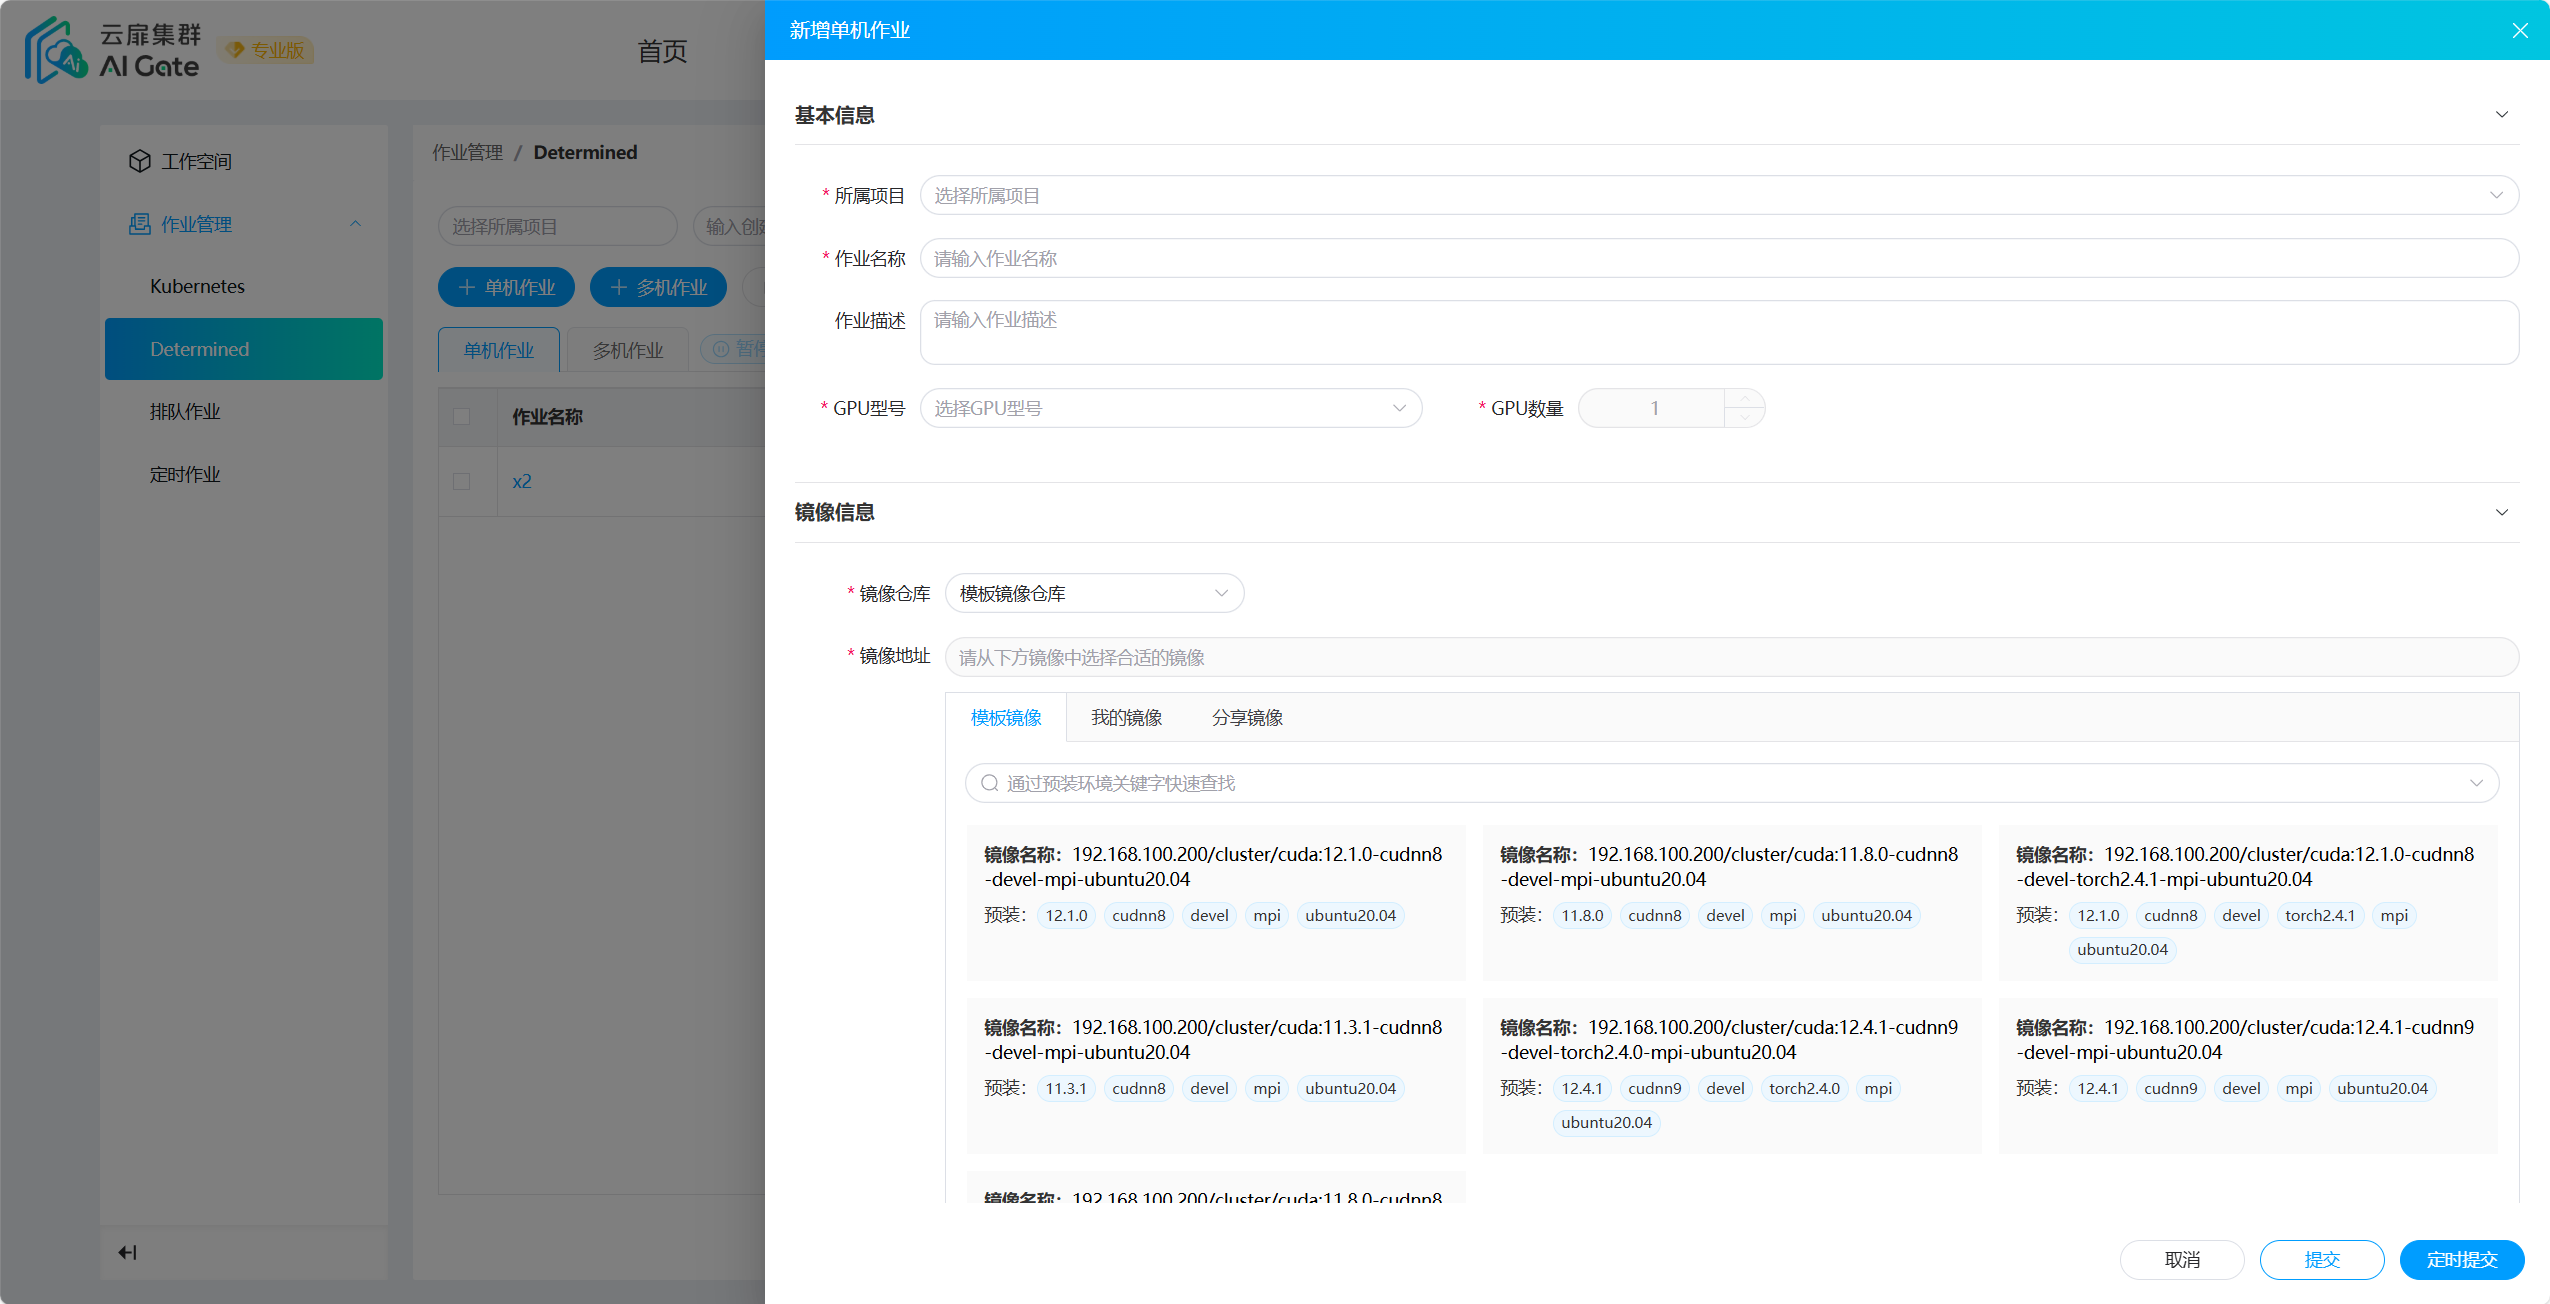
Parameter Description
| Parameter | Description | Example |
|---|---|---|
| GPU Count | Number of GPU cards mounted into the container for this job. | |
| Image | Base image selected by the user for the single-machine job. | |
| Mounts | Mounts platform distributed storage (file management) into the container, mainly for datasets or result storage. | |
| Entrypoint | Shell command to be executed by the user. | python xxx.py, mkdir xxx |
| Training Code Path | Absolute path of the code project uploaded by the user; the system will execute the Entrypoint command in this path. | |
| Dependency Installation Command | Used to supplement missing dependencies in the image. | pip install xxx, apt-get install xxx |
Storage and Mounting
Mounts is the file persistence method provided by the platform.
- Purpose: Used to mount large datasets into containers or save intermediate files that need to be persisted after job completion.
- Configuration:
hostis the file management path,containeris the mount directory inside the container. - Write Permission: If write operations are needed, do not use
ReadOnlymode. - Execution Path:
Entrypointcommands are executed by default under theTraining Code Path.
Single-Machine Job Example
Assume there is an object detection code project with the following structure: 
The following are the steps to submit this project through a single-machine job:
- Upload Code: Upload the code project (including dataset and code) via file management, and record the project path.
- Select Resources: Select the image and GPU card count.
- Data Mounting: Mount the dataset to a path inside the container (e.g., mount
path1topath2). - Weight Mounting: Mount weight files to a path inside the container (e.g., mount
path3topath4). - Code Path Modification: Modify the dataset and weight reading paths in the code to point to
path2andpath4respectively. - Configure Entrypoint: Enter the executable command in
entrypoint(e.g.,python train.py). - Install Dependencies: Fill in the required dependency installation commands.
Sample code is available here. Submit the single-machine job according to the following settings: 

Single-Machine Job Notes
- Code Path Capacity: Training code path capacity is generally
95M; large files are recommended to use mounting. - Non-Deep Learning Tasks: Single-machine jobs only allocate resources; users can customize Shell commands to execute non-deep learning tasks.
- Intermediate File Storage: Since resources are released after job completion, all intermediate files that need to be saved must be specified to distributed storage directories mounted into the container.
- Function Limitations: Since user code is not restricted, related job visualization functions are unavailable.
- Multi-Machine Simulation: Users familiar with multi-machine multi-GPU can obtain IPs and set environment variables, then start
torchrunand other commands to create multiple single-machine jobs to simulate multi-machine jobs. - Environment Standards: Do not fill in non-standard Shell commands in
entrypoint. If installinganaconda, it is recommended to usexxx/.../anaconda/envs/xxx/bin/pythonfor execution, or trysource activate, avoiding direct use ofconda activate.
Determined Multi-Machine Jobs
The Determined multi-machine job system is another multi-machine job mode provided by the platform. At least 2 core files are required to run. Taking faster-rcnn as an example, the complete code project is here
Required Files
Taking faster-rcnn as an example, the core code structure is as follows: 
| File Name | Description | Necessity |
|---|---|---|
distributed.yaml | Experiment configuration file, defining hyperparameters, resources, etc. | Required |
model_def.py | Model code file, containing model structure, dataset, training logic, etc. | Required |
startup-hook.sh | Shell script for configuring missing environment dependencies. | Optional (can be omitted if dependencies are not missing) |
Note: Users' own deep learning code (such as code downloaded from GitHub) only needs to add the above required files to submit jobs.
File Generation
distributed.yaml: Generated through relevant parameters on the web configuration page.model_def.py: Needs to be written by users (refer to PyTorch/Keras tutorials below), and ensure it is at the same level as the other two files.startup-hook.sh: Generated through theDependency Environment Installation Commandfield on the web page.
Important: Datasets should not be placed under the code project files; it is recommended to use mounting, corresponding to the
bind_mountsfield indistributed.yaml.
Determined Multi-Machine Job Example
Taking FCOS code as an example, submit a Determined multi-machine job: 

Summary
Users need to package their code projects and add the following required files to perform Determined job scheduling:
| File | Description | Source |
|---|---|---|
distributed.yaml | Experiment configuration file | System can help generate |
model_def.py | Model code file | Users need to write according to API rules |
startup-hook.sh | Dependency installation script | System can help generate (optional) |
Multi-Machine Job Introduction
Running the First Experiment
In this tutorial, we will show you how to integrate training examples with the YanFlow cluster environment. We will run our experiments on the local training environment.
Note: This tutorial uses MNIST handwritten digit recognition as an example, recommended for deep learning AI model developers who are new to YanFlow cluster jobs.
Code files are here
The YanFlow cluster job system requires at least two files: a .yaml file (used to configure job-related information) and a .py file (used to define model structure, dataset, optimizer, and other common deep learning information).
Extract the code files under file management, path is /public/mnist-test-ddp. Fill in the information as follows: 

After completing the form, click Confirm to submit the job.
Note: Ensure the filled parameters are consistent and file paths actually exist.
PyTorch MNIST Tutorial
This tutorial describes how to port existing PyTorch models to the YanFlow cluster job system. We will port the MNIST dataset to a simple image classification model. This tutorial is based on the official PyTorch MNIST example.
To use PyTorch models in the YanFlow cluster job system, you need to port the model to the system's API. For most models, this porting process is straightforward, and once the model is ported, all YanFlow cluster features will be available. For example, you can perform distributed training or hyperparameter search without changing model code, and your models will be automatically stored and visualized.
When training PyTorch models, YanFlow cluster provides a built-in training loop that feeds each batch of training data to the train_batch function, which should perform forward pass, backward pass, and calculate training metrics. Additionally, YanFlow cluster handles log management and device initialization. To insert model code into the designated training loop, methods need to be defined to perform the following tasks:
Initialize model, optimizer, and learning rate scheduler
Define forward and backward training functions
Define evaluation function to calculate loss and other metrics on validation dataset
Load training dataset
Load validation dataset
Then, the training loop will automatically call these functions for the training loop. These functions should be organized into a trial class, which is a user-defined Python class inheriting from determined.pytorch.PyTorchTrial. Below we introduce how to write the first trial class, then how to use the YanFlow cluster job system to run custom training jobs.
Building a PyTorchTrial Class
Below is the skeleton structure of the trial class:
import torch.nn as nn
from determined.pytorch import DataLoader, PyTorchTrial, PyTorchTrialContext


class MNISTTrial(PyTorchTrial):
    def __init__(self, context: PyTorchTrialContext):
        # Initialize the trial class and wrap the models, optimizers, and LR schedulers.
        pass

    def train_batch(self, batch: TorchData, epoch_idx: int, batch_idx: int):
        # Run forward passes on the models and backward passes on the optimizers.
        pass

    def evaluate_batch(self, batch: TorchData):
        # Define how to evaluate the model by calculating loss and other metrics
        # for a batch of validation data.
        pass

    def build_training_data_loader(self):
        # Create the training data loader.
        # This should return a determined.pytorch.Dataset.
        pass

    def build_validation_data_loader(self):
        # Create the validation data loader.
        # This should return a determined.pytorch.Dataset.
        pass
Next, we will explain in detail how to implement each function in this class, which inherits from the PyTorchTrial class.
Constructor __init__ Method
Like other Python classes, the __init__ method is called to construct our trial class. A parameter context is passed to this method. context contains information about model training, such as hyperparameter values. All models and optimizers must be wrapped using our provided methods wrap_model and wrap_optimizer, which are provided by PyTorchTrialContext. In this MNIST example, the current values of model hyperparameters can be accessed through the get_hparam() method provided by context.
def __init__(self, context: PyTorchTrialContext):
    # Store trial context for later use.
    self.context = context

    # Create a unique download directory for each rank so they don't overwrite each
    # other when doing distributed training.
    self.download_directory = f"/tmp/data-rank{self.context.distributed.get_rank()}"
    self.data_downloaded = False

    # Initialize the model and wrap it using self.context.wrap_model().
    self.model = self.context.wrap_model(
        nn.Sequential(
            nn.Conv2d(1, self.context.get_hparam("n_filters1"), 3, 1),
            nn.ReLU(),
            nn.Conv2d(
                self.context.get_hparam("n_filters1"),
                self.context.get_hparam("n_filters2"),
                3,
            ),
            nn.ReLU(),
            nn.MaxPool2d(2),
            nn.Dropout2d(self.context.get_hparam("dropout1")),
            Flatten(),
            nn.Linear(144 * self.context.get_hparam("n_filters2"), 128),
            nn.ReLU(),
            nn.Dropout2d(self.context.get_hparam("dropout2")),
            nn.Linear(128, 10),
            nn.LogSoftmax(),
        )
    )

    # Initialize the optimizer and wrap it using self.context.wrap_optimizer().
    self.optimizer = self.context.wrap_optimizer(
        torch.optim.Adadelta(
            model.parameters(), lr=self.context.get_hparam("learning_rate")
        )
    )
Loading Data
The methods to define are build_training_data_loader and build_validation_data_loader. The YanFlow cluster job system uses these methods to load training and validation datasets respectively. Both methods should return a data loader similar to torch.utils.data.DataLoader.
def build_training_data_loader(self):
    if not self.data_downloaded:
        self.download_directory = data.download_dataset(
            download_directory=self.download_directory,
            data_config=self.context.get_data_config(),
        )
        self.data_downloaded = True

    train_data = data.get_dataset(self.download_directory, train=True)
    return DataLoader(train_data, batch_size=self.context.get_per_slot_batch_size())


def build_validation_data_loader(self):
    if not self.data_downloaded:
        self.download_directory = data.download_dataset(
            download_directory=self.download_directory,
            data_config=self.context.get_data_config(),
        )
        self.data_downloaded = True

    validation_data = data.get_dataset(self.download_directory, train=False)
    return DataLoader(
        validation_data, batch_size=self.context.get_per_slot_batch_size()
    )
Defining train_batch Method
The train_batch() method obtains a batch of data from the training dataset; it should perform forward pass on the model, backward pass on the loss, and process the optimizer. This method should return a dictionary containing user-defined training metrics; YanFlow cluster will automatically average all metrics across batches. If the optimizer is set to automatically handle gradient zeroing, step_optimizer will zero the gradients, and there is no need to call optimizer.zero_grad().
def train_batch(self, batch: TorchData, epoch_idx: int, batch_idx: int):
    batch = cast(Tuple[torch.Tensor, torch.Tensor], batch)
    data, labels = batch

    # Define the training forward pass and calculate loss.
    output = self.model(data)
    loss = torch.nn.functional.nll_loss(output, labels)

    # Define the training backward pass and step the optimizer.
    self.context.backward(loss)
    self.context.step_optimizer(self.optimizer)

    return {"loss": loss}
Defining evaluate_batch Method
A single batch of data from the validation dataset is passed to the evaluate_batch() method; it calculates user-defined validation metrics and returns them as a dictionary mapping metric names. Validation metrics for each batch are aggregated to generate a single metric for the entire validation set. By default, validation metrics are averaged.
def evaluate_batch(self, batch: TorchData):
    batch = cast(Tuple[torch.Tensor, torch.Tensor], batch)
    data, labels = batch

    output = self.model(data)
    validation_loss = torch.nn.functional.nll_loss(output, labels).item()

    pred = output.argmax(dim=1, keepdim=True)
    accuracy = pred.eq(labels.view_as(pred)).sum().item() / len(data)

    return {"validation_loss": validation_loss, "accuracy": accuracy}
Training the Model
Now that we have completed the model code porting (completed .py file writing), we can use the YanFlow cluster job features. In the YanFlow cluster job system, a trial is a training task consisting of a dataset, a deep learning model, and values for all model hyperparameters. An experiment is a collection of one or more trials: an experiment can train a single model (using a single trial), or define a search over a user-defined hyperparameter space (multiple trials).
To create an experiment, we first write a configuration file (.yaml) that defines the type of experiment we want to run. Below is an example yaml:
name: mnist_pytorch_const
data:
  url: https://s3-us-west-2.amazonaws.com/determined-ai-test-data/pytorch_mnist.tar.gz
hyperparameters:
  learning_rate: 1.0
  global_batch_size: 64
  n_filters1: 32
  n_filters2: 64
  dropout1: 0.25
  dropout2: 0.5
records_per_epoch: 50_000
searcher:
  name: single
  metric: validation_loss
  max_length:
    epochs: 1
  smaller_is_better: true
entrypoint: model_def:MNistTrial
entrypoint specifies the name of the trial class to use. Generally, code projects will contain multiple model code files, so specifying the file name will be necessary. In this case, we use model_def:MNistTrial as the parameter value for entrypoint, where model_def is the file name without extension of the model code file model_def.py. For more parameter information in yaml, please refer to the experiment configuration file details section.
Evaluating the Model
Model evaluation is automatically completed by the system; users only need to access the corresponding interface in a web browser to obtain relevant information (accuracy metrics, loss, etc.).
PyTorch Tutorial
The YanFlow cluster job system provides high-level framework APIs for PyTorch and Keras, allowing users to describe their models without boilerplate code. The system reduces boilerplate by providing state-of-the-art training loops that offer distributed training, hyperparameter search, automatic mixed precision, and many other features.
In this tutorial, we will successfully organize PyTorch code into the PyTorchTrial API through an example. Once your code is in PyTorchTrial format, you can easily leverage the YanFlow cluster job system to submit custom jobs.
Although diverse deep learning algorithms are different, code that executes deep learning training often follows a paradigm with the same type of code structure. Typically, it consists of a model, optimizer, dataset, and learning rate scheduler. We recommend extracting components from source project code files in the following order for YanFlow cluster job scheduling:
1. Model
2. Optimizer
3. Data (dataloader)
4. Training/validation process (train/validate batch)
5. Learning rate scheduler
6. Other features, such as automatic mixed precision (amp), gradient clipping, etc.
We will fill the components from source project code files into corresponding methods in the trial class sequentially, then apply a yaml configuration file to execute the job.
Preparation
Before starting, we need to create core files. Two files need to be defined: model definition file (.py) and experiment configuration file (.yaml).
Model Definition File
The model definition file contains a trial class. Below is an example:
from typing import Any, Dict, Union, Sequence
from determined.pytorch import DataLoader, PyTorchTrial, PyTorchTrialContext

TorchData = Union[Dict[str, torch.Tensor], Sequence[torch.Tensor], torch.Tensor]

class MyTrial(PyTorchTrial):
    def __init__(self, context: PyTorchTrialContext) -> None:
        self.context = context

    def build_training_data_loader(self) -> DataLoader:
        return DataLoader()

    def build_validation_data_loader(self) -> DataLoader:
        return DataLoader()

    def train_batch(self, batch: TorchData, epoch_idx: int, batch_idx: int)  -> Dict[str, Any]:
        return {}

    def evaluate_batch(self, batch: TorchData) -> Dict[str, Any]:
        return {}
Experiment Configuration File
We also need to create an experiment configuration file. This file defines specific experiment information, such as sample count, training epochs, and hyperparameters. We recommend adding all hyperparameters to this file for convenient hyperparameter tuning, hyperparameter search, or job restart.
In this example, hyperparameter search functionality is not used. Example:
name: imagenet-test # Job name
description: ImageNet_PyTorch_const # Job description
hyperparameters: # Hyperparameters
    global_batch_size: 256
    dense1: 128
    data: /mnt/data
    arch: resnet18
    workers: 4
    start-epoch: 0
    lr: 0.1
    momentum: 0.9
    weight_decay: 1e-4
    pretrained: True
records_per_epoch: 12181167 # Number of /images/zh/help in ImageNet training set
searcher:
    name: single # Not using hyperparameter search
    metric: acc # Validation metric
    smaller_is_better: false # Keep best weights based on validation metric
    max_length:
        epochs: 10 # Train 10 epochs
entrypoint: model_def:ImageNetTrial # Job entry file and class name
max_restarts: 0 # Job restart count
For more parameter information in the experiment configuration yaml, please refer to the experiment configuration file field details section.
Model
Now that we have completed preparation, we can start porting by creating the model. Model code will be placed in the __init__() function of trial. We use self.context.wrap_model() to wrap the model from source code, which automatically converts the model to CUDA without explicitly specifying model.cuda(). Specifically, users can obtain corresponding hyperparameter values from the yaml file through self.context.get_hparams().
def __init__(self, context: PyTorchTrialContext):
    self.context = context

    arch = self.context.get_hparam("arch")
    if self.context.get_hparam("pretrained"):
        print("=> using pre-trained model '{}'".format(arch))
        model = models.__dict__[arch](pretrained=True)
    else:
        print("=> creating model '{}'".format(arch))
        model = models.__dict__[arch]()

    self.model = self.context.wrap_model(model)
Optimizer/Loss Function
Optimizer and loss function will also be added in the __init__ method. The optimizer needs to be wrapped by our provided self.context.wrap_optimizer() function. For learning rate scheduler (LR Scheduler), we provide a self.context.wrap_lr_scheduler() function to wrap learning rate schedulers under the torch.optim.lr_scheduler class. Updated code block:
def __init__(self, context: PyTorchTrialContext):
    self.context = context

    arch = self.context.get_hparam("arch")
    if self.context.get_hparam("pretrained"):
        print("=> using pre-trained model '{}'".format(arch))
        model = models.__dict__[arch](pretrained=True)
    else:
        print("=> creating model '{}'".format(arch))
        model = models.__dict__[arch]()

    self.model = self.context.wrap_model(model)

    optimizer = torch.optim.SGD(
        self.model.parameters(),
        self.context.get_hparam("lr"),
        momentum=self.context.get_hparam("momentum"),
        weight_decay=self.context.get_hparam("weight_decay")
    )
    self.optimizer = self.context.wrap_optimizer(optimizer)
    lr_sch = torch.optim.lr_scheduler.StepLR(
        self.optimizer, gamma=0.1, step_size=2
    )
    self.lr_sch = self.context.wrap_lr_scheduler(
        lr_sch, step_mode=LRScheduler.StepMode.STEP_EVERY_EPOCH
    )
    self.criterion = nn.CrossEntropyLoss()
Data
Now we start filling in build_train_data_loader() and build_validation_data_loader(). Both data loading functions return a DataLoader similar to PyTorch. Their parameters are almost identical, used to handle data for distributed training.
def build_training_data_loader(self):
    traindir = os.path.join(self.download_directory, 'train')
    self.normalize = transforms.Normalize(mean=[0.485, 0.456, 0.406],
                                std=[0.229, 0.224, 0.225])

    train_dataset = datasets.ImageFolder(
        traindir,
        transforms.Compose([
            transforms.RandomResizedCrop(224),
            transforms.RandomHorizontalFlip(),
            transforms.ToTensor(),
            self.normalize,
        ]))

    return DataLoader(
        train_dataset,
        batch_size=self.context.get_per_slot_batch_size(),
        shuffle=True,
        num_workers=self.context.get_hparam("workers", pin_memory=True)
)def build_validation_data_loader(self):
valdir = os.path.join(self.download_directory, 'val')
self.normalize = transforms.Normalize(mean=[0.485, 0.456, 0.406],
std=[0.229, 0.224, 0.225])
val_dataset = datasets.ImageFolder(
valdir,
transforms.Compose([
transforms.RandomResizedCrop(224),
transforms.RandomHorizontalFlip(),
transforms.ToTensor(),
self.normalize,
]))
return DataLoader(
val_dataset,
batch_size=self.context.get_per_slot_batch_size(),
shuffle=False,
num_workers=self.context.get_hparam("workers", pin_memory=True)
)Training/Validation
Now we start setting up the train_batch function. Typically in PyTorch, users iterate through and train their models via DataLoader. In YanFlow cluster, train_batch() provides processing for one batch, so we can copy the code directly into the function. self.accuracy function is a user-defined function to calculate accuracy for each batch. For the train_batch method, forward pass and backward pass need to be implemented. The YanFlow cluster job system provides two functions self.context.backward() and self.context.step_optimizer() for wrapping.
def train_batch(self, batch: TorchData, epoch_idx: int, batch_idx: int):
    /images/zh/help, target = batch
    output = self.model(/images/zh/help)
    loss = self.criterion(output, target)
    acc1, acc5 = self.accuracy(output, target, topk=(1, 5))

    self.context.backward(loss)
    self.context.step_optimizer(self.optimizer)

    return {"loss": loss.item(), 'top1': acc1[0], 'top5': acc5[0]}
For the evaluate_batch function, backward pass is not needed.
def evaluate_batch(self, batch: TorchData):
    /images/zh/help, target = batch
    output = self.model(/images/zh/help)
    val_loss = self.criterion(output, target)
    acc1, acc5 = self.accuracy(output, target, topk=(1, 5))

    return {"val_loss": loss.item(), 'top1': acc1[0], 'top5': acc5[0]}
For more advanced APIs, such as mixed precision or gradient clipping, we will introduce them in the following sections.
TensorFlow Keras Tutorial
This tutorial will use Fashion MNIST data as an example to demonstrate how to port a simple image classification algorithm tf.keras to our YanFlow cluster system. This tutorial is based on Tensorflow's high-level API Keras.
When training a tf.keras model, the YanFlow cluster job system provides a built-in training loop that feeds batch data to user's model, performs backward pass, and calculates training metrics. To implement YanFlow cluster scheduling for tensorflow high-level API Keras, methods need to be defined to perform the following tasks:
Initialization
Build model graph
Build training set
Build validation set
The YanFlow cluster job system will automatically call these functions for the training loop. These methods should be organized into a trial class, which is a user-defined Python class inheriting from determined.keras.TFKerasTrial
Code project files are here
Building the trial Class
Below is the skeleton structure of the trial class:
import keras
from determined.keras import TFKerasTrial, TFKerasTrialContext


class FashionMNISTTrial(TFKerasTrial):
    def __init__(self, context: TFKerasTrialContext):
        # Initialize the trial class.
        pass

    def build_model(self):
        # Define and compile model graph.
        pass

    def build_training_data_loader(self):
        # Create the training data loader. This should return a keras.Sequence,
        # a tf.data.Dataset, or NumPy arrays.
        pass

    def build_validation_data_loader(self):
        # Create the validation data loader. This should return a keras.Sequence,
        # a tf.data.Dataset, or NumPy arrays.
        pass
Constructor __init__ Method
Like other Python classes, the __init__ method is called to construct our trial class. A parameter context is passed to this method. context contains information about model training, such as hyperparameter values. This instance does not need to access any attributes, but we assign it to an instance variable for later use:
def __init__(self, context: TFKerasTrialContext):
    # Store trial context for later use.
    self.context = context
Building the Model
The build_model() method returns a compiled tf.keras.Model object. The Fashion MNIST model code uses the Keras Sequential API, which we can continue to use in the build_model implementation. The only small difference is that the model needs to be wrapped by calling self.context.wrap_model() before compilation, and the optimizer needs to be wrapped by calling self.context.wrap_optimizer().
def build_model(self):
    model = keras.Sequential(
        [
            keras.layers.Flatten(input_shape=(28, 28)),
            keras.layers.Dense(self.context.get_hparam("dense1"), activation="relu"),
            keras.layers.Dense(10),
        ]
    )

    # Wrap the model.
    model = self.context.wrap_model(model)

    # Create and wrap optimizer.
    optimizer = tf.keras.optimizers.Adam()
    optimizer = self.context.wrap_optimizer(optimizer)

    model.compile(
        optimizer=optimizer,
        loss=tf.keras.losses.SparseCategoricalCrossentropy(from_logits=True),
        metrics=[tf.keras.metrics.SparseCategoricalAccuracy(name="accuracy")],
    )
    return model
Loading Data
The last two methods users need to define are build_training_data_loader() and build_validation_data_loader(). The YanFlow cluster job system uses these methods to load training and validation datasets respectively.
The system supports three ways to load data into tf.Keras API, such as tf.keras.utils.Sequence, tf.data.Dataset, or numpy.array. Since the dataset is small, the Fashion MNIST model uses NumPy arrays to represent data. Below is an example:
def build_training_data_loader(self):
    train_/images/en/help, train_labels = data.load_training_data()
    train_/images/en/help = train_/images/en/help / 255.0

return train_/images/en/help, train_labelsdef build_validation_data_loader(self):
test_/images/en/help, test_labels = data.load_validation_data()
test_/images/en/help = test_/images/en/help / 255.0
return test_/images/en/help, test_labelsTraining the Model
Now that model code porting is complete, we can train a single instance of the model or perform hyperparameter search.
To create an experiment, a configuration file also needs to be written, which defines the type of experiment we want to run. In this case, we want to train the model for 5 epochs without hyperparameter search. The configuration file yaml is as follows:
name: fashion_mnist_keras_const
hyperparameters:
    global_batch_size: 32
    dense1: 128
records_per_epoch: 50000
searcher:
    name: single
    metric: val_accuracy
    max_length:
      epochs: 5
entrypoint: model_def:FashionMNISTTrial
The yaml configuration file is similar to the PyTorch example. For more parameter information in the experiment configuration yaml, please refer to the experiment configuration file field details section.
Evaluating the Model
Model evaluation is automatically completed by the system; users only need to access the corresponding interface in a web browser to obtain relevant information (accuracy metrics, loss, etc.).
Examples
The YanFlow cluster Determined job system provides numerous examples for reference, including computer vision and natural language processing. These examples can be found in the repository.
Model Repository
The YanFlow cluster internally integrates the MMDetection framework.
MMDetection
MMDetection is an open-source project launched by Tencent and CUHK for object detection tasks. It implements a large number of object detection algorithms based on PyTorch, encapsulating processes such as dataset construction, model building, and training strategies into modules. Through module invocation, we can implement new algorithms with very little code, greatly improving code reusability.
The YanFlow cluster encapsulates it and calls it through written middleware. If you have some understanding of MMDetection, you can get started quickly. If you meet the following conditions, this feature will be very convenient for your work:
You want to use a powerful integrated framework to perform object detection that can be easily extended according to requirements.
You are a user who wants to quickly start using MMDetection.
You are an MMDetection user who wants to easily run multi-node distributed training and advanced hyperparameter search.
The simplest way to use MMDetection is to start from the provided Faster-RCNN experiment configuration README. Related code files are here. We provide a tutorial on how to use MMDetection and introduce how to modify configurations for custom behaviors.
Model Developer Guide
Training API
You can use the Training API to train almost any deep learning model. The API guide describes how to use your existing model code and train your model in the YanFlow cluster job system.
PyTorch API
This tutorial explains how to modify PyTorch version code projects to submit jobs. Here we mainly discuss the writing of the model code file model_def.py.
To train PyTorch models in the YanFlow cluster job system, you need to implement a trial class inheriting from PyTorchTrial and specify it as entrypoint in the experiment configuration file.
Users need to write specific functions representing components used during training. Below is a good starting template for model_def.py:
from typing import Any, Dict, Union, Sequence
from determined.pytorch import DataLoader, PyTorchTrial, PyTorchTrialContext

TorchData = Union[Dict[str, torch.Tensor], Sequence[torch.Tensor], torch.Tensor]

class MyTrial(PyTorchTrial):
    def __init__(self, context: PyTorchTrialContext) -> None:
        self.context = context

    def build_training_data_loader(self) -> DataLoader:
        return DataLoader()

    def build_validation_data_loader(self) -> DataLoader:
        return DataLoader()

    def train_batch(self, batch: TorchData, epoch_idx: int, batch_idx: int)  -> Dict[str, Any]:
        return {}

    def evaluate_batch(self, batch: TorchData) -> Dict[str, Any]:
        return {}
Dataset Download
Before performing training tasks, datasets need to be prepared first. We recommend the following methods:
Upload through our file management system;
Upload directly on the host (recommended);
Download in
startup-hook.sh;Download in the constructor
__init__.
If you are running distributed training experiments, we recommend using method 2. During distributed training, multiple processes need to run on different containers. To allow all processes to access data and prevent multiple download processes (one process per GPU) from conflicting with each other, data should be downloaded to unique directories at different ranks. Multi-threaded download example:
def __init__(self, context) -> None:
    self.context = context

    # Create a unique download directory for each rank so they don't overwrite each
    # other when doing distributed training.
    self.download_directory = f"/tmp/data-rank{self.context.distributed.get_rank()}"
    self.download_directory = download_data(
       download_directory=self.download_directory,
       url=self.context.get_data_config()["url"],
    )
Data Loading
Loading data into PyTorchTrial is accomplished by defining two functions, build_training_data_loader() and build_validation_data_loader(). Both data loading functions return an instance similar to PyTorch's DataLoader. determined.pytorch.DataLoader will return a batch of data, which will be directly fed to train_batch() and evaluate_batch() functions. The batch size of the data loader is calculated based on the global_batch_size field and slots_per_trial field in the experiment configuration file (.yaml). The self.context.get_per_slot_batch_size() function can automatically calculate the batch size per card. Below is an example:
def build_training_data_loader(self):
    traindir = os.path.join(self.download_directory, 'train')
    self.normalize = transforms.Normalize(mean=[0.485, 0.456, 0.406],
                                std=[0.229, 0.224, 0.225])

    train_dataset = datasets.ImageFolder(
        traindir,
        transforms.Compose([
            transforms.RandomResizedCrop(224),
            transforms.RandomHorizontalFlip(),
            transforms.ToTensor(),
            self.normalize,
        ]))

    return DataLoader(
        train_dataset,
        batch_size=self.context.get_per_slot_batch_size(),
        shuffle=True,
        num_workers=self.context.get_hparam("workers", pin_memory=True),
)def build_validation_data_loader(self):
valdir = os.path.join(self.download_directory, 'val')
self.normalize = transforms.Normalize(mean=[0.485, 0.456, 0.406],
std=[0.229, 0.224, 0.225])
val_dataset = datasets.ImageFolder(
valdir,
transforms.Compose([
transforms.RandomResizedCrop(224),
transforms.RandomHorizontalFlip(),
transforms.ToTensor(),
self.normalize,
]))
return DataLoader(
val_dataset,
batch_size=self.context.get_per_slot_batch_size(),
shuffle=False,
num_workers=self.context.get_hparam("workers", pin_memory=True),
)The output of train_batch() is one of the following batch data formats:
# A numpy array
batch: np.ndarray = np.array([0, 0], [0, 0])
# A PyTorch tensor
batch: torch.Tensor = torch.Tensor([[0, 0], [0, 0]])
# A tuple of arrays or tensors
batch: Tuple[np.ndarray] = (np.array([0, 0]), np.array([0, 0]))
batch: Tuple[torch.Tensor] = (torch.Tensor([0, 0]), torch.Tensor([0, 0]))
# A list of arrays or tensors
batch: List[np.ndarray] = [np.array([0, 0]), np.array([0, 0])]
batch: List[torch.Tensor] = [torch.Tensor([0, 0]), torch.Tensor([0, 0])]
# A dictionary mapping strings to arrays or tensors
batch: Dict[str, np.ndarray] = {"data": np.array([0, 0]), "label": np.array([0, 0])}
batch: Dict[str, torch.Tensor] = {"data": torch.Tensor([0, 0]), "label": torch.Tensor([0, 0])}
# A combination of the above
batch = {
    "data": [
        {"sub_data1": torch.Tensor([[0, 0], [0, 0]])},
        {"sub_data2": torch.Tensor([0, 0])},
    ],
    "label": (torch.Tensor([0, 0]), torch.Tensor([[0, 0], [0, 0]])),
}
__init__ Method
Users need to use the provided context constructor to initialize objects that will be used during training. These objects include model, optimizer, learning rate scheduler, and custom loss and metric functions.
Steps for initializing with context are generally as follows:
Initialize models and wrap them with
context.wrap_model().Initialize optimizers and wrap them with
context.wrap_optimizer().Initialize learning rate schedulers and wrap them with
context.wrap_lr_scheduler().If automatic mixed precision is needed, wrap models and optimizers with
context.configure_apex_amp().Define custom loss functions and metric functions.
Warning: If you do not wrap some of your models, optimizers, and learning rate schedulers,
you may see metrics for paused and later resumed trials that are significantly different
from non-paused trials. The reason is that model state may not be accurately or completely
restored from checkpoints. When using PyTorch, this can sometimes happen if PyTorch APIs
are not used correctly.
Below is a code example:
self.context = context

self.a = self.context.wrap_model(MyModelA())
self.b = self.context.wrap_model(MyModelB())
self.opt1 = self.context.wrap_optimizer(torch.optim.Adam(self.a))
self.opt2 = self.context.wrap_optimizer(torch.optim.Adam(self.b))

(self.a, self.b), (self.opt1, self.opt2) = self.context.configure_apex_amp(
    models=[self.a, self.b],
    optimizers=[self.opt1, self.opt2],
    num_losses=2,
)

self.lrs1 = self.context.wrap_lr_scheduler(
    lr_scheduler=LambdaLR(self.opt1, lr_lambda=lambda epoch: 0.95 ** epoch),
    step_mode=LRScheduler.StepMode.STEP_EVERY_EPOCH,
)
train_batch() Method
Note: The YanFlow cluster job system automatically collects metrics from different GPUs (ranks)
(referencing loss here) and averages them, which users do not need to do themselves. Users
only need to implement forward pass and backward pass and update the optimizer. Changes are
needed for optimizer.zero_grad(), loss.backward(), and optimizer.step(). self.context will
be used to call loss backward pass and handle zeroing and stepping the optimizer.
Note: Metrics returned by train_batch() are automatically averaged and displayed, so we do
not need to do this ourselves.Users only need to implement forward pass, backward pass, and update optimizer information using our API. The main functions involved are optimizer.zero_grad(), loss.backward(), and optimizer.step(). The final example is as follows:
def train_batch(self, batch: TorchData, epoch_idx: int, batch_idx: int):
    /images/zh/help, target = batch
    output = self.model(/images/zh/help)
    loss = self.criterion(output, target)
    acc1, acc5 = self.accuracy(output, target, topk=(1, 5))

    self.context.backward(loss)
    self.context.step_optimizer(self.optimizer)

    return {"loss": loss.item(), "top1": acc1[0], "top5": acc5[0]}
If using gradient clipping, please set it in the train_batch() method. Below is an example:
# Assume two models, two optimizers, and two LR schedulers were initialized
# in ``__init__``.

# Calculate the losses using the models.
loss1 = self.model1(batch)
loss2 = self.model2(batch)

# Run backward passes on losses and step optimizers. These can happen
# in arbitrary orders.
self.context.backward(loss1)
self.context.backward(loss2)
self.context.step_optimizer(
    self.opt1,
    clip_grads=lambda params: torch.nn.utils.clip_grad_norm_(params, 0.0001),
)
self.context.step_optimizer(self.opt2)

# Step the learning rate.
self.lrs1.step()
self.lrs2.step()
return {"loss1": loss1, "loss2": loss2}
evaluate_batch() Method
Note: Metrics returned by evaluate_batch() are automatically averaged. Example:
def evaluate_batch(self, batch: TorchData):
    /images/zh/help, target = batch
    output = self.model(/images/zh/help)
    validation_loss = self.criterion(output, target)
    return {"validation_loss": loss.item()}
Weights
PyTorch weight files saved after training completion contain 4 keys:
models_state_dictoptimizers_state_dictlr_schedulers_state_dictcallbacks
Keras API
This section introduces how to use the Keras API under Tensorflow. You need to implement a trial class inheriting from TFKerasTrial and specify it as entrypoint in the experiment configuration file.
To understand this API, users can start from the following examples:
Below is a simple template; users need to implement specific methods:
import keras
from determined.keras import TFKerasTrial, TFKerasTrialContext


class TFKerasTrial(TFKerasTrial):
    def __init__(self, context: TFKerasTrialContext):
        # Initialize the trial class.
        pass

    def build_model(self):
        # Define and compile model graph.
        pass

    def build_training_data_loader(self):
        # Create the training data loader. This should return a keras.Sequence,
        # a tf.data.Dataset, or NumPy arrays.
        pass

    def build_validation_data_loader(self):
        # Create the validation data loader. This should return a keras.Sequence,
        # a tf.data.Dataset, or NumPy arrays.
        pass
Data Loading
Loading data is accomplished through build_training_data_loader() and build_validation_data_loader() methods. They should return one of the following data types:
Tuple of NumPy arrays
(x, y). x must be a NumPy array (or array-like), list of arrays (if model has multiple inputs), or dictionary mapping input names to corresponding arrays (if model has named inputs). y should be a NumPy array.Tuple of NumPy arrays
(x, y, sample_weights)tf.data.Datasettype, returning tuples composed of(inputs, targets)or(inputs, targets, sample_weights).keras.utils.Sequencetype, returning tuples composed of(inputs, targets)or(inputs, targets, sample_weights).
Assuming tf.data.Dataset is used, users need to wrap training and validation datasets using self.context.wrap_dataset(). For best performance, users should wrap datasets immediately after creating them.
Model Definition
Users need to wrap models before compilation using self.context.wrap_model(). After wrapping is complete, call model.compile(), typically done in the build_model() method.
Custom model.fit Invocation
The TFKerasTrial interface allows users to configure model.fit by calling self.context.configure_fit(). A simple example:
class MyTFKerasTrial(det.keras.TFKerasTrial):
    def __init__(self, context):
        ...
        self.context.configure_fit(verbose=False, workers=5)

        # It is safe to call configure_fit() multiple times.
        self.context.configure_fit(use_multiprocessing=True)
Weights
Retained weights are h5 files, using tf.keras.models.save_model. For more information, please refer to Keras Documentation.
DeepSpeed API (To Do)
The YanFlow cluster Determined job will support DeepSpeed in future versions.
Hyperparameter Search
Hyperparameter tuning is a common machine learning process of selecting data, features, model architecture, and learning algorithms to produce effective models. Given the potentially large number of hyperparameters, hyperparameter tuning is a challenging problem.
Machine learning engineers can manually guess and test hyperparameters, or they can narrow the search space by using pre-trained models. However, even if engineers achieve seemingly good model performance, they may wonder if additional tuning could do better. The YanFlow cluster job system provides hyperparameter search, reducing the cost of manual parameter tuning. For example, searching for the best learning rate, best network modules, etc.
Configuring Hyperparameter Search Range
The first step to implement automatic hyperparameter tuning is to define the hyperparameter space, for example, by listing factors that may affect model performance. For each hyperparameter in the search space, machine learning engineers specify a range of possible values in the experiment configuration:
hyperparameters:
  ...
  dropout_probability:
    type: double
    minval: 0.2 # Determine search range through minval and maxval
    maxval: 0.5
  ...
The system supports the following searchable hyperparameter types:
int: Integer with range.double: Floating-point number with range.log: Floating-point number scaled logarithmically; users specify base, searching exponential space within a range.categorical: Variable that can take values from a set of specified discrete values. Values themselves can be any type.
The experiment configuration file field details section explains these data types and their related options in detail.
Hyperparameter Search Methods
The YanFlow cluster job system's hyperparameter search methods are shown in the table below, corresponding to the name field under the searcher field in the experiment configuration file.
| Hyperparameter Search Algorithm | Hyperparameter Search Description | |
|---|---|---|
single | Regular experiment, no hyperparameter search. | |
grid | Grid, because grid does not take action based on search state or progress. | |
random | Gracefully terminate current trial, create a new trial with a set of randomly sampled hyperparameters, add trial to trial queue. | |
adaptive | Gracefully terminate and delete metrics related to current trial, create a new trial with a set of randomly sampled hyperparameters. |
Search Method Details
Adaptive (Asynchronous) Method
The adaptive_asha search method adopts an asynchronous version of the Asynchronous Successive Halving Algorithm (ASHA), suitable for large-scale experiments with hundreds or thousands of trials.
Quick Start
Below are some recommended initial settings for adaptive_asha that typically work well.
Search Mode:
mode: Set tostandard
Resource Settings:
max_length: Maximum training length. This quantity is domain-specific and should roughly reflect the number of batches the model must train to converge on the dataset. For users who want to determine this value through experiments, the single search method can be used to train a model with reasonable hyperparameters.max_trials: Total number of hyperparameter settings that will be evaluated in trials. Setmax_trialsto at least 500 to leverage the acceleration brought by early stopping. You can also set a largermax_trialsand stop the experiment after reaching desired performance.max_concurrent_trials: Maximum number of parallel trials.
Note: This method is extremely resource-consuming and has high server performance requirements.
Grid Method
The grid search method generates trials on a "grid" of hyperparameter configurations and trains each trial according to the training duration specified by max_length. Users specify a set of values for each hyperparameter through the hyperparameters field in the experiment configuration. The "grid" of hyperparameter configurations is generated by taking the product of these sets. For example, if value sets for three independent hyperparameters aparam, bparam, and cparam are specified as {0,1,2}, {10,20}, and {"c"} respectively, the generated tuple (aparam, bparam, cparam) grid is:
(0, 10, "c")
(0, 20, "c")
(1, 10, "c")
(1, 20, "c")
(2, 10, "c")
(2, 20, "c")
The way to specify hyperparameter sets depends on hyperparameter type:
const: Contains only a single value. For example, the abovecparamcan be specified asconstwithval: c.categorical: The set of values is the set of categorical values. For example, the abovebparamcan be specified as a hyperparameter withvals: [10,20].int: Values from the[minval, maxval]range, including endpoints. Ifcountis greater than the number of integer values in the range, it is interpreted as the entire range of integer values in[minval, maxval]. For example, the aboveaparamcan be specified as aninttype hyperparameter withminval: 0,maxval: 2,count: 3orcount: 100.double: Values from the[minval, maxval]range, including endpoints. The set{0.1,0.3,0.5}can be specified asdoubletype withminval: 0.1,maxval: 0.5,count: 3.log: Values from the[base^minval, base^maxval]range, including endpoints. For example, the set{0.00001,0.0001,0.001}can be specified as aloghyperparameter withbase: 10,minval: -5,maxval: -3,count: 3.
Random Method
The random search method randomly selects hyperparameters from the configured hyperparameter space, generating max_trials trials. Each trial is trained for the number of units specified by max_length (see training units), then the trial's validation metric is calculated.
Single Method
single represents regular trials without hyperparameter search. Only max_length needs to be specified to perform model training tasks.
Recommended Job Usage Methods
Use frameworks to implement learning rate scheduling instead of directly changing learning rate.
For files that need to be downloaded (e.g., data, configurations, pre-trained weights), store them in advance in the user directory and use through mounting.
For experiment hyperparameters that need frequent adjustment (e.g., learning rate, thresholds in networks, etc.), it is recommended to place them in the experiment configuration file
.yamlfor convenient adjustment. Users can obtain corresponding values in the model code filemodel_def.pythrough the presetcontext.get_hparam_()method.For missing dependencies in distributed /images/zh/help, they can be installed by generating
startup-hook.shfiles.
References
Experiment Configuration File Field Details
Training Section
Some configuration settings during training, such as training epochs, iteration count, model inference interval, weight saving interval, etc.
max_length: Maximum runtime of the experiment, training unit. Required field.records: Labeled data (sometimes called samples, not a field in yaml, here for explanation only).batches: A batch refers to a group of records, commonly speaking the total number of iterations. The number ofrecordsin a batch is configured through theglobal_batch_sizefield. Optional field.epochs: An epoch is a unit for one minimum iteration over the entire training dataset;recordsof an epoch are configured through therecords_per_epochconfiguration field. Optional field.
For example, to specify max_length by batches size, configure as follows:
max_length:
  batches: 900
To express it with records or epochs, records or epochs will be specified instead of batches. For epochs, the records_per_epoch field must also be specified. Below is an example of training a model for 64 epochs:
records_per_epoch: 50000
searcher:
  name: single
  metric: validation_error
  max_length:
    epochs: 64
  smaller_is_better: true
The field records_per_epoch is only used for configuration fields under the epochs model. The actual records_per_epoch value is determined by the dataset itself (specifically, when the training data loader exhausts records, the epoch ends).
Note: There are two modes for defining training duration in the YanFlow cluster job system: epochs mode and batches mode. Users can use according to their needs. Generally, epoch mode is used more. When epoch specifies model training duration, batch size cannot be evenly distributed, and remaining "partial batch" data will be discarded (ignored). For example, if an experiment is configured to train on 10 records with batch size 3, the model will only train on 9 data points. In special cases, if configured to train on less than a single batch of data, a single complete batch of data will be used.
Experiment Information Related
name: User-defined experiment name; required field;description: User description of the experiment. Optional field;labels: Used to label the current user; YanFlow cluster backend will automatically validate this field and determine the current user starting the job. Optional field;data: This field can be used to specify information about how the experiment accesses and loads training data. The content and format of this field are user-defined. It should be used to specify any configuration needed to load data for use by the experiment model definition. For example, if your experiment loads data from Amazon S3, thedatafield may contain S3 bucket name, object prefix, and AWS authentication credentials. Optional field;workspace: Name of the experiment's workspace.workspaceandprojectfields must either both exist or both not exist. Optional field;project: Project name. Optional field;
Job Entry Address
entrypoint: This field defines what type of job needs to run. General format is filename:classname format.<model_file>:<object_class>, for example,model_def:MyTrial. After definition is complete, the YanFlow cluster job system will find the class under this file and perform distributed multi-machine multi-GPU tasks. Required field.
Basic Configuration
scheduling_unit: Log printing interval, default value is100, meaning log printing is completed every 100 iterations. Users print logs as needed. If the interval is set too small, it will result in excessive logs, increasing system overhead and reducing training throughput. Optional field;records_per_epoch: Commonly speaking, this is the number of data points in the training set. The YanFlow cluster job system needs to know this value to determine the number of iterations per epoch. This field only appears when training duration is specified asepochs; forbatches, no setting is needed. Users determine whether this field is needed as required;max_restarts: This field defines the job restart count, default value is5. When a job fails (due to network fluctuations, etc.), the YanFlow cluster job system will attempt to resubmit the job. Users can set this value as needed. When users are familiar with the YanFlow cluster job system, it is recommended to set this value to 0 or 1. Optional field.
Model Validation Related
min_validation_period: This field refers to the interval for using the validation set to evaluate the model, unit isbatchesorepochs(related to user-defined training mode). Optional field. Example:
min_validation_period:
epochs: 2 # Model evaluation every 2 epochsmin_validation_period:
batches: 900Weight Related
min_checkpoint_period: Weight saving interval, similar tomin_validation_period, it also has two units:batchesorepochs. Optional field. Example:
min_checkpoint_period:
epochs: 1min_checkpoint_period:
batches: 1000checkpoint_storage: Model weight saving path. Required field;save_experiment_best: Number of best trial weights to save across all trials, judged by metric. Optional field;save_trial_best: Number of best trial weights to save. Optional field;save_trial_latest: Number of latest weights to save. Optional field;
These values can be used for weight management, reclaiming some garbage weights, and reducing storage overhead.
save_experiment_best: 0
save_trial_best: 1
save_trial_latest: 1
Weight Storage Types
Weight saving currently supports gcs, s3, azure, and shared_fs, identified by the type field. Depending on the type used, other fields may also be required.
Shared File System
The most common type is shared_fs, which saves weights locally. For YanFlow cluster users, it is recommended to save to distributed storage (/mnt/volume/userdata/xxx). Users only need to specify the host_path field. Usage example:
checkpoint_storage:
  host_path: /mnt/volume/userdata/public/ckpt
  save_experiment_best: 0
  save_trial_best: 1
  save_trial_latest: 1000000
  type: shared_fs
Google Cloud Storage
checkpoint_storage:
  type: gcs
  bucket: <your-bucket-name>
Amazon S3
Weights will be stored in Amazon S3 or S3-compatible object storage (such as MinIO). This type requires specifying bucket, access_key, secret_key, prefix (optional field), and endpoint_url (optional field).
Azure Blob Storage
This type stores weights in Microsoft's Azure Blob Storage. Users need to specify fields container, connection_string, account_url, credential (optional field).
Hyperparameter Related
hyperparameters defines the hyperparameter space of the experiment. To access hyperparameter values in the experiment, use the provided method context.get_hparam(). For example, the value named learning_rate in the yaml file can be accessed by calling context.get_hparam("learning_rate").
global_batch_size: Total batch size, meaning this value is evenly distributed to each card. Ensure this value is divisible by the number of allocated cards.
Note: Any experiment contains a hyperparameter global_batch_size, which is used to calculate batch size per rank (users only need to specify total batch size; for batch size per GPU card, it is automatically calculated by the YanFlow cluster backend). Users can obtain batch size per rank through our preset functions
context.get_per_slot_batch_size()andcontext.get_global_batch_size().
The hyperparameter space is defined by a dictionary. Each key in the dictionary is a hyperparameter name; the associated value defines the hyperparameter range. If the value is a scalar, the hyperparameter is constant; otherwise, the value should be a nested mapping. Below is an example:
hyperparameters:
  global_batch_size: 64
  optimizer_config:
    optimizer:
      type: categorical
      vals:
        - SGD
        - Adam
        - RMSprop
    learning_rate:
      type: log
      minval: -5.0
      maxval: 1.0
      base: 10.0
  num_layers:
    type: int
    minval: 1
    maxval: 3
  layer1_dropout:
    type: double
    minval: 0.2
    maxval: 0.5
Now we introduce common hyperparameter data types in yaml:
Integer
int is an integer variable. The minimum and maximum values of the variable are defined by minval and maxval respectively (value range includes both endpoints). Maximum and minimum values are generally used in hyperparameter search; users determine whether to define them based on their needs.
When performing grid search, the count field must also be specified; this defines the number of points for this hyperparameter in the grid. Discrete values in the value range are evenly divided according to this field.
Double
double is a floating-point variable. The minimum and maximum values of the variable are defined by minval and maxval respectively (value range includes both endpoints). Maximum and minimum values are generally used in hyperparameter search; users determine whether to define them based on their needs.
When performing grid search, the count field must also be specified. Discrete values in the value range are evenly divided according to this field.
Log
log is a logarithmic scale variable, with its base specified by the base field. Maximum and minimum values are generally used in hyperparameter search; users determine whether to define them based on their needs.
When performing grid search, the count field must also be specified. Discrete values in the value range are evenly divided according to this field.
Categorical
categorical is a special type, similar to a set of specific values. Its values are defined by the val field. The types it stores can be any valid yaml type, such as bool, string, number, collection.
Searcher
The searcher field defines whether to perform hyperparameter search and the method of searching hyperparameters. If not performing hyperparameter search, specify as single type. If users need to perform hyperparameter search, the YanFlow cluster job system provides 3 different hyperparameter search methods: adaptive_asha, random, and grid methods.
The name of the hyperparameter search method to use is configured through the name (required field) field. Remaining fields configure searcher behavior and depend on the searcher used. For example, to configure a random hyperparameter search with 5 trials, each trial iterating 1000 times:
searcher:
  name: random
  metric: accuracy
  max_trials: 5
  max_length:
    batches: 1000
Single
nameset tosingledoes not perform hyperparameter search, which is the most common method. In this mode, all hyperparameters must be constants and cannot have range definitions.metric: Metric used to evaluate model performance. Generally comes from the key in the dictionary returned in theevaluate_batch()method inmodel_def.py. Required field.max_length: Training duration of the experiment. Generally specified as epochs or batches. Required field.
max_length:
   epochs: 2
If specified as epochs, the records_per_epoch field must be specified.
smaller_is_better: Whether to minimize or maximize the metric, default value istrue. Generally for loss, specify astrue; for accuracy, specify asfalse. Optional field.
Random
nameset torandomimplements a simple random parameter search. This method randomly samples from the hyperparameter space. Each trial is trained according to the specified length, then validation metrics are calculated.metric: Metric used to evaluate model performance. Generally comes from the key in the dictionary returned in theevaluate_batch()method inmodel_def.py. Required field.max_trials: Maximum number of experiments. Required field.max_length: Training duration of the experiment. Generally specified as epochs or batches. Required field.
max_length:
batches: 2smaller_is_better: Whether to minimize or maximize the metric, default value istrue. Generally for loss, specify astrue; for accuracy, specify asfalse. Optional field.max_concurrent_trials: Maximum number of parallel trials, default is16. When this value is set to0, the YanFlow cluster job system will start multiple trials simultaneously as much as possible. Optional field.
Grid
nameset togridmethod applies grid for search.metric: Metric used to evaluate model performance. Generally comes from the key in the dictionary returned in theevaluate_batch()method inmodel_def.py. Required field.max_length: Training duration of the experiment. Generally specified as epochs or batches. Required field.
max_length:
   epochs: 12
If specified as epochs, the records_per_epoch field must be specified.
smaller_is_better: Whether to minimize or maximize the metric, default value istrue. Generally for loss, specify astrue; for accuracy, specify asfalse. Optional field.max_concurrent_trials: Maximum number of parallel trials, default is16. When this value is set to0, the YanFlow cluster job system will start multiple trials simultaneously as much as possible. Optional field.
Adaptive ASHA
metric: Metric used to evaluate model performance. Generally comes from the key in the dictionary returned in theevaluate_batch()method inmodel_def.py. Required field.max_length: Training duration of the experiment. Generally specified as epochs or batches. Required field.
max_length:
epochs: 2max_trials: Maximum number of experiments. Required field.smaller_is_better: Whether to minimize or maximize the metric, default value istrue. Generally for loss, specify astrue; for accuracy, specify asfalse. Optional field.mode: This field specifies when to end search and stop trials. There are three modes:aggressive,standard, andconservative. Default value isstandardand this method is recommended. Optional field.max_concurrent_trials: Maximum number of parallel trials, default is16. When this value is set to0, the YanFlow cluster job system will start multiple trials simultaneously as much as possible. Optional field.
Resource
The resource section defines resources to adapt to use.
slots_per_trial: Total number of GPUs for YanFlow cluster job scheduling. To reasonably utilize computing resources, only whole-machine scheduling is allowed, and GPU models must be consistent (all 4090s, otherwise short board effect will occur, causing computing waste). For machines equipped with 8 A100 cards, this value can only be set to 8, 16, 32, and other multiples of 8 (do not exceed the total number of GPUs the cluster can call). Required field.shm_size: Shared memory of the container when the job runs. Default value is4294967296(4GB). Users adjust as needed, or directly set to128Mor1.5G. Required field.resource_pool: GPU resource pool used. If no resource pool is specified, the default GPU resource will be used.
Bind Mounts
bind_mounts: Defines directories that need to be mounted in the container when the job runs, generally dataset mount paths. For the YanFlow cluster job system, it is recommended to place datasets in distributed storage, and NFS mounting is also supported. Users need to ensure all node machines can access this path. Optional field.
host_path: File system path, recommended to use YanFlow cluster's distributed storage system. Optional.container_path: Mount path inside the container running the job, recommended to use absolute paths. Mounting to the container's internal working path is not allowed. Recommended to mount under/mntor/datapaths. Optional field.read_only: Whether read-only mode, default isfalse. Optional field.
bind_mounts:
  - host_path: /data
    container_path: /data
  - host_path: /mnt/read-only-data
    container_path: /mnt/read-only-data
read_only: truebind_mounts:
- host_path: /data
container_path: /dataEnvironment
The environment section is used to configure the job container environment.
image: Distributed job image used by YanFlow cluster. Default uses image with tagcuda-11.3-pytorch-1.12-tf-2.11-gpu-0.24.0. Users can select /images/zh/help from our preset distributed job image repository as needed to adapt to different requirements. Optional field.
Note: Environment dependencies can be added or removed through startup-hook.sh. However, if
pytorch is reinstalled in startup-hook.sh, horovod must be recompiled and installed. We do
not recommend this approach, as it may cause unknown job errors.force_pull_image: Whether to pull image from dockerhub, default value isfalse. Optional field.registry_auth: Users can pull custom /images/zh/help from dockerhub. Optional field. If used, the following fields need to be specified:usernamepasswordserveraddress
environment_variables: Environment variables. Use formatNAME=VALUE.experiment_seed: Experiment random seed, default will randomly initialize value. Value range is between 0 and 2^31-1.
Some Usage Recommendations
For users familiar with YanFlow cluster Determined jobs, to achieve more flexible experiment configurations, it is recommended to directly use advanced mode for online yaml editing.
The minimum unit for job scheduling is a node, meaning an entire host. For users who only use single-machine multi-GPU jobs, container mode is recommended. If users are familiar with distributed job frameworks, we provide some /images/zh/help in container /images/zh/help. Users can perform distributed training by starting multiple containers.
The project folder used by the YanFlow cluster Determined job system has size limits. It is recommended to mount datasets into the job container through mounting, corresponding to using the
bind_mountsfield. The mount directory of the YanFlow cluster job system is generally distributed storage, path is/mnt/volume/userdata/xxx. When users manage files,/mnt/volume/userdata/is hidden. When adding mount paths in advanced mode, this prefix needs to be added.Hyperparameters that need frequent modification are recommended to be placed in yaml for easy modification and job restart.
epochsmode is recommended for convenient training cycle management.It is recommended to use YanFlow cluster's distributed storage to store project code files, i.e., upload from file management.
singlecan meet general user needs. For hyperparameter search, it consumes large amounts of resources and causes long-term occupation of compute nodes. It is not recommended for users new to the YanFlow cluster job system.For metrics that are difficult to calculate, it is recommended to use loss as the return value of the
evaluate_batch()function. Download weights and perform local evaluation testing, which can save the code for defining reducers.For job container shared memory, users need to set based on available machine memory and job-required memory. In most cases, no consideration is needed; directly give the machine's maximum memory.
Log printing interval should not be too small, set through the
scheduling_unitfield. In cases with excessive total iterations, it may affect training performance and increase total training time.